In Microsoft Word, you will quickly find the compare documents features under REVIEW -> Compare. However, comparing two sheets in Microsoft Excel is not pretty straightforward. As mentioned at this link, Microsoft has created a separate add-on Spreadsheet Compare that needs to be invoked from the Start menu to compare two sheets in Excel. The comparison results are mentioned in a separate pane with the columns of Cell, Value 1, Value 2, and Change Description. It can be quite confusing for a novice user of Excel.
In this blog post, I am presenting a better approach to finding differences between two sheets. I will present the solution in both cases, i.e. if 1) both sheets are in the same workbook and 2) if both sheets are in different workbooks. Although you will have to write some VBA (Visual Basic for Applications) code to accomplish this task, the code is very simple. You just need to copy-paste this code and change the names of the workbook and sheets to make it work for you.
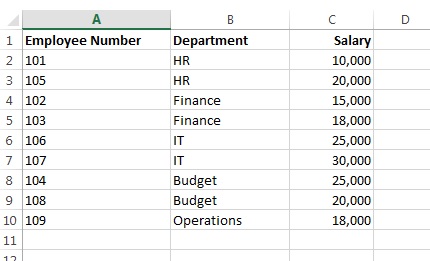
Suppose you created two workbooks Employees Jan.xlsx and Employees Feb.xlsx. The file Employees Jan.xlsx has a sheet Jan. The file Employees Feb.xlsx has a sheet Feb. Sheet Jan contains employees’ names and salaries of January Payroll. Sheet Feb contains employees’ names and salaries for February Payroll. Now you have to find out what changed in Feb? i.e. How many new employees were inducted and if there were changes in the salaries of the existing employees. Sheet Jan and Sheet Feb look as follows:
Sheet: Jan
Sheet: Feb
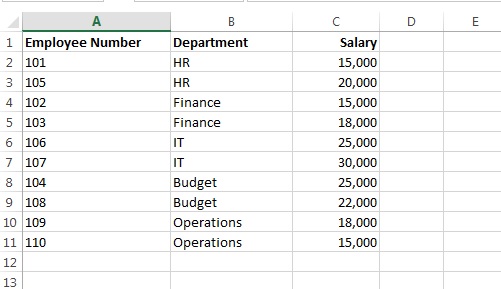
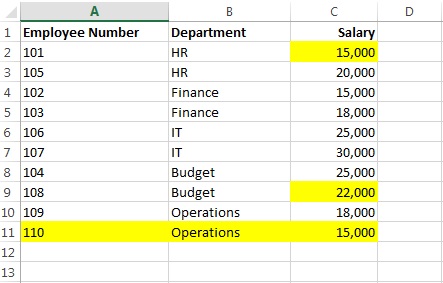
As it is a small dataset with sample values, you can even see manually that Sheet Feb differs from Sheet Jan in some ways. The salary is changed for Employee Numbers 101 and 108. Moreover, a new employee with Employee Number 110 is inducted. The code below will yellow-highlight these entries in Feb sheet.
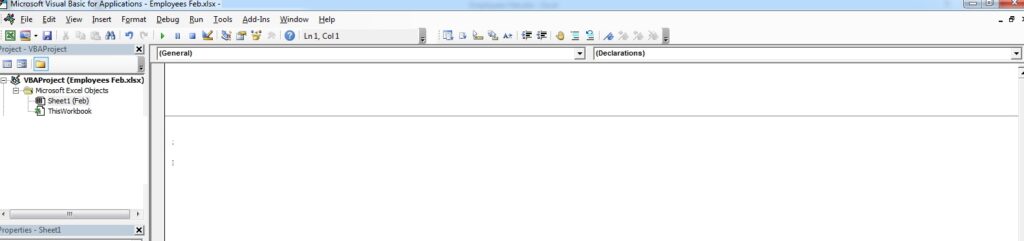
Place the cursor/pointer on any cell in the Feb sheet such as A1. Now press Alt+F11. You will see the following screen:
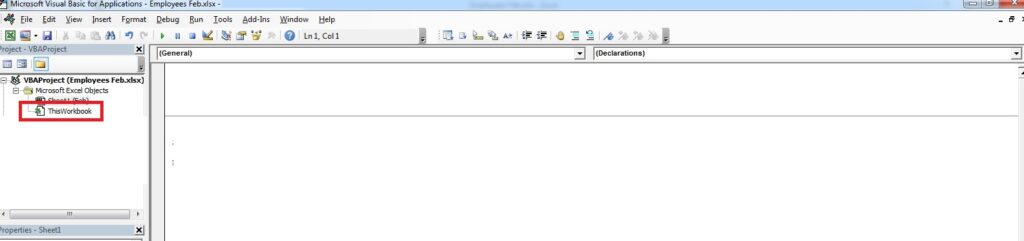
Now double-click ThisWorkbook as shown below:
Now enter the following code in the Code area:
Sub CompareSheets()
Dim rngCell As Range

For Each rngCell In Worksheets("Feb").UsedRange

    If Not rngCell = Workbooks("Employees Jan.xlsx").Worksheets("Jan").Cells(rngCell.Row, rngCell.Column) Then
        rngCell.Interior.Color = vbYellow
    End If

Next rngCell

End Sub
The code will look like this in the Code window:

Now place the cursor anywhere between Sub CompareSheets() and End Sub and press F5 to execute the code.
Now when you see the Feb sheet, you will observe that salaries for Employee Numbers 101 and 108 are yellow-highlighted because salaries have been increased in Feb. You will also notice that all the information of Employee Number 110 is yellow-highlighted because he is a new employee. The final output will be as follows:
Now delete the code and copy-paste it whenever you need it. You cannot retain the code for future use because Excel does not allow to store macros in xlsx files. For this purpose, you will have to save the file as an xlsm or Macro-Enabled file.
Suppose you have both sheets Jan and Feb in the same workbook. In that case, you are not required to mention the file name, and the code can further be simplified as follows:
Sub CompareSheets()
Dim rngCell As Range

For Each rngCell In Worksheets("Feb").UsedRange

    If Not rngCell = Worksheets("Jan").Cells(rngCell.Row, rngCell.Column) Then
        rngCell.Interior.Color = vbYellow
    End If

Next rngCell

End Sub
41 thoughts on “Excel: How to find differences between two sheets. Same and Different Workbooks”